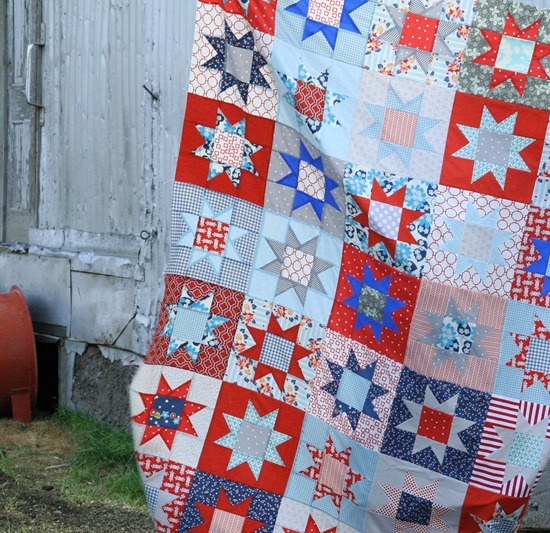
This is probably the most basic star block. But it is a classic favorite that looks good in any fabric, and is easy to re-size to make smaller or larger.
You can see my full quilt top here. Or the finished quilt here.
My blocks finish at 11" (10.5" after squaring…if you square them).

Start with 8 – 4" background squares, 1 – 4" center square, and 8 – 3" squares for the star points.
On 4 of the background squares place a 3" square in a corner right sides together and sew from corner to corner. The tape trick comes in handy again on these blocks. Cut the corner off leaving ¼" and press open.
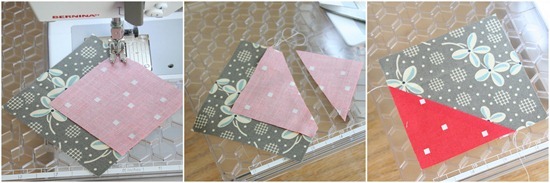
Place another 3" square in an adjacent corner and repeat the steps.

Layout your squares again and sew the squares into three rows.

Press the seams of each row in opposite directions, and sew the rows together.

The finished block should be 11". I squared my blocks up to 10.5".
![IMG_9056_thumb[1]](http://cluckclucksew.com/wp-content/uploads/2011/08/IMG_9056_thumb1.jpg)
48 blocks (6 in each row, 8 rows) makes a perfect twin size at 60" x 80".
Carol
Those are great...love the way they float! And no points to match at the center square and the flying geese...great block!
Linda
I love the colors you used. This has always been among my favorite blocks. Good tutorial, too!
Barb
You have saved my sanity. I have been trying to make my granddaughter a star quilt for about 3 weeks now. All those 1/8", 7/8" and so forth have been horrible for me. Now I come across your pattern for a star block and wow, first try it turns out fabulous! I cannot thank you enough for this simple tutorial that comes out perfect everytime. Thank you so much!
Sandra
A wonderful work!!
danahollis
Oh I just LOVE this quilt!
Plum Patchwork
I adore that quilt - the red, gray, white, and blue are so fabulous and summery!
Esch House Quilts
Thanks for the tutorial. I love the way the base of the star points overlap. I hadn't given much thought about how to do this, but the way you do it is so simple. Thanks!
Sarah Craig
Great tutorial! I need to make some of these, and had been wondering just how you do it!!
Victoria Paige @ Boutique Uniquely
Normally I'm not big on red, white and blue quilts or anything of the sort, but I love this. It's so fresh and pretty.
krisgray
Very cute! Thanks for the tute.
Karenkay
this block never gets old!
Krista Hansen
Thank you so much for posting this!!! I love this block but didn't know how to do it. You are my quilting idol as I start trying to become a quilter.I love everything you do.Thank you for sharing your talent.
BECKY
thanks for the tutorial!!!
Ashlee
Al, that gray flower-y fabric is SO cute, where did you get it?!
Lunden
Perfect timing for this post! Thank you so much for posting.
tentenknits
awesome tutorial!! now I just need to learn how to sew ... haha!
Brooke
Love the colors you chose for this quilt. The pattern is perfect to show them off. Thanks for this great tutorial.
Rachel
I love this! Thanks for the tutorial - this quilt may just end up on my (long long long) to-make list.
iluvmybugs
Thanks so much for this easy-to-follow tutorial!
**nicke...
i love that red square fabric so much i bought myself some yesterday! hop over to my blog and check out my finished kaleidoscope. i am seriously in love and am thinking of hand quilting... am i crazy?
Cathy
Your quilt is beautiful. Thank you for sharing your tutorial!!
Sherrill
I LOVE that way of making them. Will hafta do one like that for Quilts of Valor..AWESOME! Thanks for sharing!!
lindsay's sew trying
Thank you so much for sharing this. I am so in love with this quilt!!!
Penny
Allison
Thank you for continuing to share your amazing talent & giving us another easy to understand tutorial. You've made it so easy to make my fav star block I know that I will get a star quilt done for this 4th now & I thank you. Happy 4th!
Penny
Theophanie
You just rocked my world! You mean to tell me your blocks don't just automatically turn out squared??? All this time I thought I had Patchwork Deficiency Disorder (PDD)! I feel SO much better now!
Karen
Thanks for the great tutorial!
Melanie
Wow- you are so generous with your tutorial sharing! Thanks!
Leslie
i love a classic star and paired with the red white and blue theme....they go perfectly together. thanks for the tutorial
Sandy
Great block/quilt....thank you for sharing the tutorial!
franzif
thank you so much for the tutorial. I hope to try it out sometime.
Jamie Lee
Great tutorial! This is definitely on my to-do list. I would love to see how you quilt the top when you are all done.
Deb
You are magical!! I thought the stars would be much more difficult!! Thanks for showing how!!
Deb from clutteredquilter.blogspot.com
notes of sincerity
Thank you *SO MUCH* for sharing your tutorial with us!!
Your quilt had me swooning and now I have made a whole row of stars for my quilt and I just love them! :o) I used all my scraps of fabric!!
Have a great weekend!!
Sincerely, Trish
amandajean
thanks for the tutorial for this block! i love it! i'm a 4th of july baby, so is my sis. maybe we need matching quilts like this?
yenni
thank you for your tutorial...it's so helpful...^^
I am Just One Mom
have I told you recently how fabulous you are? well, I shant wait another minute: you did it again! you created a wonderful quilt and shared an easy to follow tutorial, also.
I share your blog addy with all my quilty friends and students.
bravo! and a well wishing thank you.
Elisabeth
I was so intimidated by star blocks, but your tutorial was amazing to follow. I can't wait to try another! I posted pictures of the baby quilt I made on my blog. :D
Jen Conlon
Great tutorial! You've been featured on the Quality Sewing Tutorials blog.
We hand select only the best free tutorials and patterns for the home sewist.
Grab a brag button!
pippi
i like your work!
i have see that you use a bernina ; ) i too- i'm swiss.
sorry for my english!
bye
SewingSophia
This is a great and stunning project!! This tutorial will certainly help a lot!! Thanks!!
Wilma
Perfect Tutorial¡¡¡ Thank you for sharing beautiful works¡¡¡
Unknown
yay! i am pretty new to quilting & have only done squares & rectangles so far. i have been curious as to how these lovely stars were made & this seems really easy! thx so much! :)
Shirley Tener
We used this tutorial for our Sept Liberty and Justice Swap, you can see some on Flicker, mine are on my blog, they are super fun and easy.. Thank you, Shirley from SimpleSew funnymesjc at gmail dot com
Mary Deckert
Hi there! Love this tutorial! Such a pretty quilt. I have a question: If I wanted to resize, are the corner star pieces always one inch smaller than the background pieces? Thank you!
alittlebirdmademe
I used this tutorial to make my first ever quilt - and my daughter loves it. Thank you so much!
Now I have linked to it on my blog so others can use it too! http://alittlebirdmademe.wordpress.com/tutorials/
Gayle
Thank you for your awesome tutorials. I've been quilting for a couple of years, taken classes at quilting conventions, read books and so on. But as far as I'm concerned you have such fresh ideas/tip/quilting methods! (to a newbie anyway) I love your honesty too and sense of humor. Take a look at
Debbie Caffrey Turquoise Trail quilt, sewing all tiny pieces! I have a job...that was hard and it’s now a UFO. Now with this tutorial I think I can make a star quilt, which is a good thing cause I love them. Keep posting and Thanks
Pat Frontuto
This was extremely helpful, and thanks so much!
erkarts
Thank you so much for this tutorial. I am teaching myself to sew/quilt. I made this test block today and it's very easy with your directions.
CupCake2015
Last spring I was asked to sew a quilt for the youth at church to tie (cringe) and then donate to our local VA for their Final Salute Quilt project. I was honored to serve those who have served us. My mom, daughter, and I made three together and one of them was this pattern. I loved making it. Thanks for the great idea and easy instructions. I wish I could paste a picture of the quilt, but I can't make it work. The best part of this story is that, when we arrived a little before the youth to donate a big pile of quilts and listen to some veterans and the widows of others', I saw an old friend--the mom of kids I had grown up with--and we chatted. Finally I asked why she was there and she told me her husband had died earlier in the spring. I was so grateful that she could receive the star quilt I had made. Thanks, again, for everything--all the happiness you share with your readers and your delightful patterns. https://www.facebook.com/VeteransAffairs/posts/10152591440328178
CupCake2015
Maybe this will work? https://www.facebook.com/photo.php?fbid=1052790198072129&set=pcb.1052793734738442&type=3&theater
claire quilty
I've been struggling with flying geese star points. Thanks for saving my sanity with your stitch and flip method.
Julie
We're your fabric choices mostly from one line?
Allison
Nope this was a huge array of different fabrics! Sorry!
Winnie
How much fabric did you use? I'd like to try this, but I'm unsure what to buy. :)
Candice
Can this quilt be made from precut charm packs? If so, how many packs would be needed for the throw?
Mechthild
Thank you very much! I made a table runner out of three blocks, which I connected with very narrow sashing, I t is easy enough and fun to make.