![Painting furniture tips_thumb[1]](http://cluckclucksew.com/wp-content/uploads/2013/07/Painting-furniture-tips_thumb1.jpg)
I’m not an expert at painting and restoring furniture. But I have learned a lot since I’ve been doing it…and since I’ve promised a few people this post, I’m going to jot down some of my resources and painting tips for you.
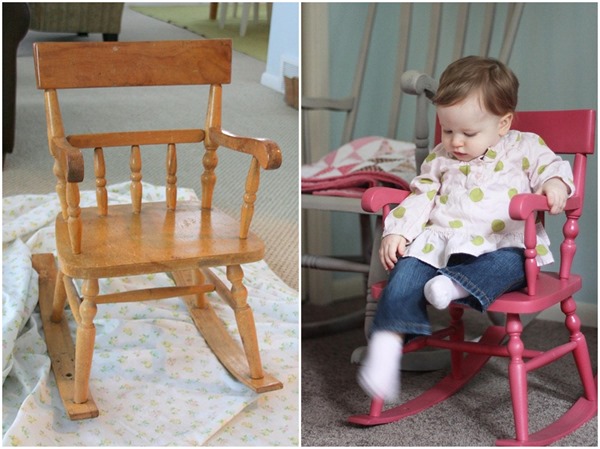
![Painting furniture_thumb[1]](http://cluckclucksew.com/wp-content/uploads/2013/07/Painting-furniture_thumb1.jpg)
I buy pieces that are in relatively good shape, and solid wood. Sometimes you have to use your imagination a little bit. Don’t be afraid of chips, dents, or wear and tear. Wood filler, wood glue, or a little bit of trim go a long way!
![IMG_4610_thumb[1]](http://cluckclucksew.com/wp-content/uploads/2013/07/IMG_4610_thumb1.jpg)
90% of the time I sand my larger pieces. If the finish is really damaged or has large flat surfaces I break out the big guns and use an electric sander.
I only sand to smooth the surface and get scratches out, but if your piece is already smooth you can actually skip the sanding. Some paints (like Chalk paint) cut out the sanding step completely…but if your surface is rough or has any scratches in it, you’ll still want to give it a good sanding. Don’t worry about getting all the cracks and crevices, just prime those areas well.
After sanding, clean your piece. If I sanded it a lot I use a vacuum brush attachment over the whole thing, then I wipe it down with wet/dry rags. Get all of the dust off!

Always always always prime. I use the Zinsser primer, it comes as a brush on paint, or as a spray paint. Both work great, but for larger pieces with large flat surfaces, I recommend lightly rolling it on or brushing it on.
Most of the time I use plain old Interior Latex paint from Home Depot…it’s usually left over paint from my house somewhere. I like to use a smooth 4" roller to do the large flat surfaces and a brush in the curved or hard to reach spots.

I think one of the biggest mistakes is not allowing the paint to dry long enough after painting. It can take up to a week for the paint to fully harden…so be patient…and leave it alone for as long as possible. Also wait for the paint to dry fully in between coats. I usually give it full day, or do a coat in the morning and one before bed.
It’s hard to wait I know…but it’ll be worth it. Plus if your like me it’s been sitting in your garage for 5 months anyways, so what’s another few days? ;)
![Tips for painting furniture_thumb[1] (1)](http://cluckclucksew.com/wp-content/uploads/2013/07/Tips-for-painting-furniture_thumb1-1.jpg)
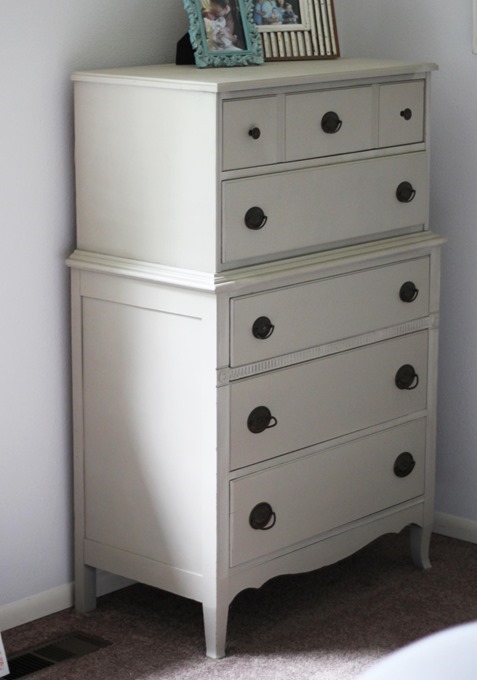
On larger pieces like a dresser or table I always use a protective finish once the paint is completely dry. I like Minwax Water Based Polycrylic just because it doesn’t have the strong fumes. On a table top or the top of a dresser I will do at least 2 or three coats to keep it protected. **If you're painting over white paint you might not want to use polycrylic. Even though it says it won't yellow I've heard from a couple of people that said it did, so use a wax product instead (some wax recommendations at the bottom of this post).
![IMG_8056_thumb_thumb[3]](http://cluckclucksew.com/wp-content/uploads/2013/06/IMG_8056_thumb_thumb3.jpg)
I love spray paint.
But spray paint doesn’t create an even sheen. So if you use it on a large dresser, table, or anything with large flat surfaces…you’ll see that some spots might be shinier or more opaque than others. Which is why I don’t use spray paint on anything larger than a nightstand.
I spray paint shiny wood, plastic, metal…everything. I rarely sand before spray paint, but I do use a spray primer as an extra precaution.

I highly recommend reading the posts from this blog. I’ve learned a lot from her, and tried some of the products she recommends. If you want to learn more about it read her great posts below:
Carie
It's such an amazing transformation from 'raw' to painted, definitely worth the effort and thank you for the top tips.
Paula Walsh
I have a large pine cupboard that I would love to paint but I'm so terrified of ruining it that I haven't been brave enought yet. I might have to JUST DO IT this summer though. Thanks for the tips :)
Amira@littlemushroomcap
thank you for sharing this.. funny that I was looking for tips via google this morning, but found none that was put clearly and as fun as yours! I was just coming here for some quilts, and I got an answer to my search! thanks! can't wait to try soon. hopefully i am patient enough to let it dry properly!
Jessica Christensen
Thank you for this post. I've been doing some refinishing -- and holding off on some refinishing because I was afraid to mess it up. Thank you for the tips and inspiration.
Diane-crewe
wow!
trish
This is fabulous information! I was actually going to ask what you use as a finish. I need to put another coat on my sewing table and let it dry better. Then finish. Thanks so much for posting!
Marika
Wow you definitely have an eye to spot the pieces that have potential !
Thanks for this post ! I'll keep my eye open now :)
Valerie
Thanks Allison! I've painted a couple pieces of furniture with mixed results. I just bought an antique bedroom set on Craigslist for my daughter's "big girl" room that I need to get started on soon, so your post is timed perfectly!
Barb
Thanks Allison! What a perfectly timed post, I am about to embark on painting my sideboard lime green!
GSGC StrongFamily
Question I'm dying to know- do you paint inside drawers, etc?
Love love love your painting amazing ness!!!!
:)
Carla
Talk about perfect timing, I just blogged about ruining my coffee table with fingernail polish remover. I've been making table runners to cover the top and think it's time to paint it.
Thanks for the info.
allison
I never paint inside the drawers!!! It will just get chipped eventually anyways...so you can leave the drawers and just paint what you see. :)
Unknown
Thanks for the useful information. I have always admired the pictures you have posted in the past. We have just moved from IL to AL to be near our oldest daughter and her familly and are sourrounded by boxes upon boxes. When we get a little more settled, I want to get an old chest of some kind for the grill tools, etc. I am going to start looking for something used to probably paint. Nancy: rangerer@sbcglobal.net
Cindy
So nice of you to share all this information! I have been wondering the steps you went through for such beautiful pieces! I'm going to have to bookmark this because I know I'll be using it as a reference! Thanks so much, Allison!!
Leigh Anne
Awesome tips and I LOVE that top piece with the chicken wire!
Mel
thank you thank you thank you!
we're doing a MAJOR home renovation and before ANY furniture comes back into this house it WILL Be painted! no living in half way done rooms EVER again!!! LOL
it's driving my husband BANANAS but oh well. I'm painting it or it can SIT in that store room! LOL!
A Quilter's Mission - Vicki
Thanks again for sharing your secrets on refinishing. I am afraid that the heat will force me to put off painting my new dresser. Your opinion please?
Chrissie
How funny, I just blogged about the painted furniture in my living room today, too! I LOVE what you've done with all of your pieces, beautiful! And isn't it just so satisfying to do it yourself? Chrissie x
Tina Craig
I just painted some furniture for my son's room this past week. Several thrifted oak pieces that I painted black. He loves it! Next week, we'll paint his room.
Centsational Girl
Thank you so much for the link love Allison! You're work is beautiful, that rocking chair is so fun in pink and your sideboard is tres chic! Loved your list of tips and resources too!
xoxo
Kate
cyndiofthevortex
I have just LOVED this post! How wonderfully you've transformed so many pieces of furniture. Very inspiring. I have a small wooden cradle from Goodwill that I now have a new vision for. Thanks for the great advice.
Brenda
I am working on miniature chest of drawers in pine that I bought as an unfinished kit. My plan is to stain it, but if it doesn't turn out, I want to paint it barn red. I bought it to use in my living room as an end table. I think the drawers will be perfect for hiding my knitting. We are supposed to have dry weather this week, so I want to complete it before next weekend---it seems that when it is rainy and humid out, things never want to dry.
Pam
Thank you for the tips and resources! I have some pieces I would like to do.
Cheryl Arkison
Perfect timing for me! I've got plans to paint a caned table I just picked up.
Rebecca Grace
Ooh, that last before-and-after of the side chair has inspired me! I've been looking for a vanity chair for my bathroom and can't find anything that I like at a good price point, but it would be so much fun to revitalize an old chair like what you've done, and then have something one-of-a-kind! I also did not know there was such a thing as spray paint primer, so thanks for that tip! :-)
Teela
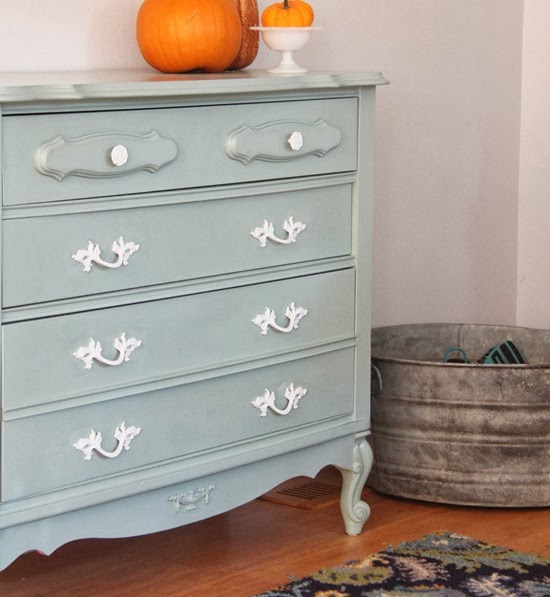
These are all such cute finished projects!! What is the paint color on the light blue dresser. It's exactly the color I've been imagining for a record cabinet we are building!!
allison
Teela I couldn't find your email...but that aqua color is called Aqua Smoke by Behr! -Al
Gina E.
You have done a fabulous job on all that furniture! Next time you are in Australia, can I persuade you to stay over at our place and fix up some old chests of drawers that I have? I suppose you want me to pay your airfare..LOL!!!
Bari Jo
THANK YOU SO MUCH! I have much I need to do and have been paralyzed with FEAR of messing up... this was very helpful! Your pieces are so pretty! You do a great job! :O)
id
Everything looks amazing! If I had more patience I would try... or maybe more time? Thanks for the inspiration.
Lynda Halliger Otvos (Lynda M O)
Fabulously informative; many thanks. Certainly does make a huge difference in a piece of beautiful furniture to give it a second chance and keep it out of the landfills and dumps we are so fond of filling with our cast-offs.
trish
Hi Allison. I bought some water based minwax in a spray can today. Yay! :0) I am going to try it out on a couple of chairs. :0) Happy 4th of July!