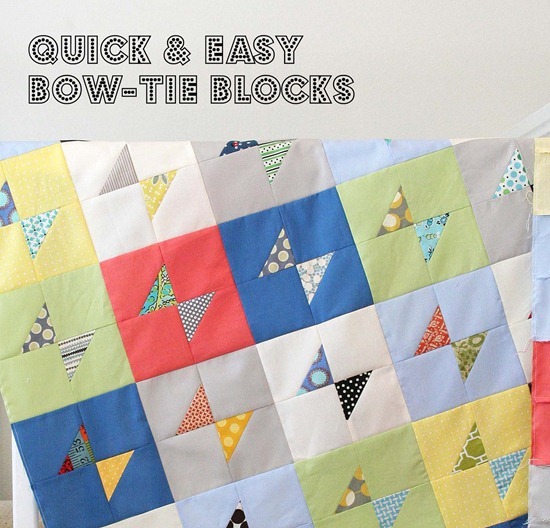
With the green light from Jolene (inspired from this quilt she made) I’m sharing a quickie tutorial for these fun little bow-tie blocks.
For each block start with:
4 background squares 3 ½" x 3 ½"
2 print squares 2 ½" x 2 ½"

Sew the print squares diagonally from corner to corner on two of the background squares, right sides together. I eyeball mine using my machine guides…but I suggest drawing a pencil line from corner to corner on the back of the print squares or using the tape trick.
![IMG_0373_thumb[4]](http://cluckclucksew.com/wp-content/uploads/2012/04/IMG_0373_thumb4.jpg)
Trim the corner leaving a ¼" seam allowance and press out.
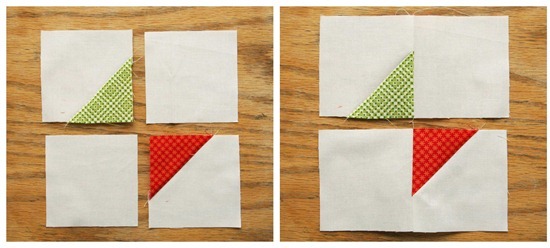
Lay them out, sew right and left sides together, press towards the print triangles…then sew the top and bottom together.

The unfinished block should measure 6 ½" x 6 ½". For a baby size quilt like mine above…I made 42 blocks and laid them out in 7 rows of 6 blocks each. This is a fun way to use scraps and extra pieces of those solids you don’t know what to do with!
(I get so much spam on this post I closed the comments...if you need help email me directly!)
Darla Mae
I want to try quilting and I think this is perfect for a beginner.Thanks! Darlene
Laura
This seems like a great pattern for a quick baby quilt.
**nicke...
so simple. so sweet. love it.
Erin Kathleen
adore this simple block! Thanks for sharing!
Jill
Beautiful quilt & easy to piece!-you give great directions. Thanks,
notes of sincerity
*love*it*
Ruth
I can do that. The triangles may be wonky, but then I'll call it a wonky bow-tie block.
It's so much fun being a noob quilter.
Live a Colorful Life
I just love this quilt--and such a great way to use up extras from other quilts.
Emily {Creative Chicks}
I love this quilt! I can see it being the next "cool" quilt design in blogland thanks to your aweosme tute. I had no idea the finished squares where so small. I kept thinking they finished much bigger. :)
toots2u
i currently have a quilt like this about half way done. after seeing Jolene's i had to make one!
CJ
So cute! Thanks for the quick tutorial. I love it when someone else does the math for me. ;)
Becky
I love bow ties, and this one is way cute! Great way to use up scraps, for sure :)
Kimberly
Thank you soooo much! Your quilt really caught my eye the first time you posted it... thanks for sharing the how-to!
Melanie@Crafty Cupboard
HOLD IT: did you serge the edge of your quilt top? Clever.
And, thank you for the tutorial, I love learning new things!
Sarah
I love this! Sewwww clever!
Sallie
Thanks for the tutorial! I will be making one of these for our church quilt ministry!
miamihoney
Looks great! Putting it on the 2012 project list :)
Teri
Thanks for the measurements. I was wondering the size when you first posted this quilt. Great quilt for a donation.
Jennifer J
Thank you!!
Sumit Sultan
I was looking for specific blogs and this list Really helped me!! Thank you for taking the time to gather
all this information!
Rahul Singh
Thanks for sharing some great ideas with us, Nice Post! Thank you for sharing great information.
Jenelle
This is a great tutorial and such a simple block. Thanks for sharing! I'm bookmarking this for sure. :)
Anna Sonata
Very nice, thanks for sharing. rental mobil jakarta
Mystica
Thank you for this tutorial. You make it look so easy!
Britt-Inger
Thanks for the tutorial. An easy and quick way to take care of the scraps. And the result looks great.
Quiltingranny
Allison I would so appreciate it if you let your readers know I am having a quilt fabric, pattern, Christmas giveaway on my blog at http://quiltingranny.blogspot.com and would love them to stop by. Also a book on grandparents raising grandchildren.
Steph Jacobson
Love this--thanks for sharing!
bethanndodd
Great, simply block! I appreciate you sharing it with us! Smiles~Beth
Judy
Simply grand! Thank you Allison. But most of all it's something I can do with a little tape. I have quite a few Amy Butler scraps. Thank you for sharing with us.
mariarrosa
Thank you! I want to make it one day.
mindingmomma
awesome tute! thanks for showing us how its done. now i want one of these quilts! it's addicting!
Simplesmente Silvinha
Wishes for a warm and wonderful Thanksgiving day
Send love and hugs and wish for your family on this special occasion.
http://tearpiaocupacional.blogspot.com/
mandyjanedesigns
These are really cute!
RaeLyn
You should put this on your tutorial side bar. I originally found this quilt on your blog, then google-searched on how to make it...I just about danced a jig when I saw you had done a tutorial. Thank you!!!
YogaBatam
Great website! It looks very good! Keep up the great work!
aimscognitive
Such a great website! It looks really good!
J Barman
Thank you for this tutorial. I really love this.
Jaganath Barman
Thanks for sharing! I'm bookmarking this for sure.
Sanjay Mishra
Thanks for sharing great tips and ideas. This blog was really helpful.
Sanju Mishra
This is an excellent post. I am thanking you for sharing this.
roservicecentreinkolkata
Great post!! Thank you very much for sharing.
nurserockz
I LOVE this pattern! Thank you!