
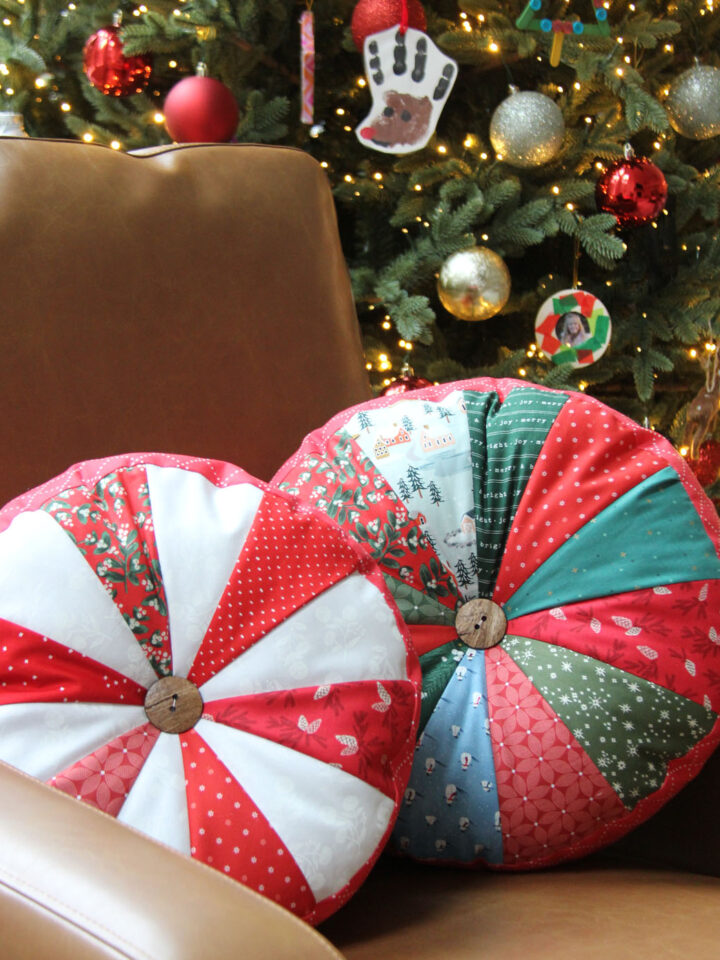
I took a break from my To-Do list last weekend to make a new pincushion (or 2). These would make cute little gifts, so I included a quick template and tutorial if you’d like to make your own.
You’ll need to print the template found at the link below:
1. Cut out 10 wedges
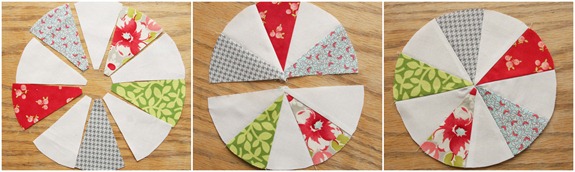
2. Use a ¼" seam allowance. Pin and sew the wedges into 2 halves, pressing the seams open, or towards the colored fabrics. Be careful not to stretch all those bias edges!
3. Sew the halves together. You’ll notice even my wedges stretched slightly during sewing and didn’t line up after sewing…just trim off the excess slightly with scissors to make a nice round circle again. Press the seam open to reduce bulk.

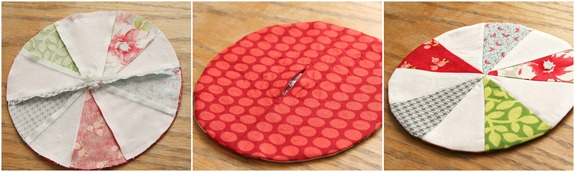
4. For the back you’ll need a 8 ½" square of fabric. Cut the fabric in half down the middle.

5. Now sew the two halves back together…but this time leave a 2" hole in the center for turning. Make sure to back stitch really well on either side of the opening so it won’t come apart during stuffing.

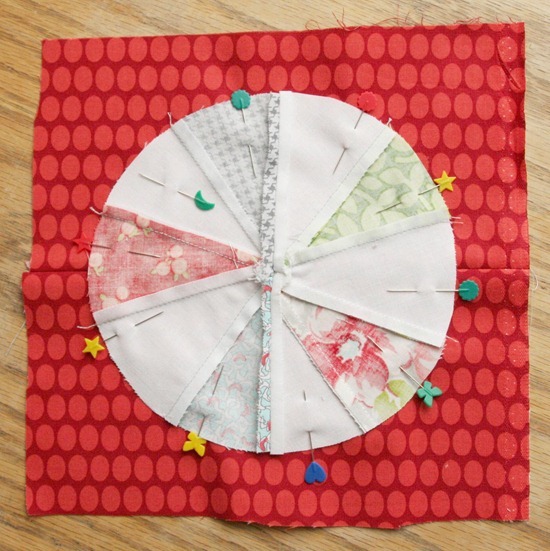
6. Center the top of the pincushion right side down on the backing with the turning hole in the center. Pin and sew all the way around the edges…no need to leave another hole.
7. Trim around the circle with scissors and turn right side out through the hole in the back. Press.
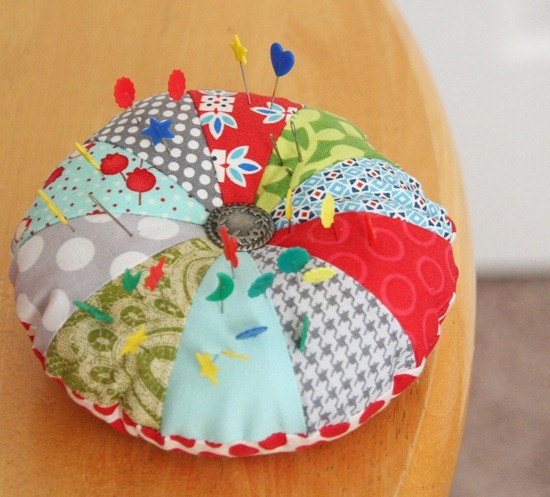
8. Stuff it good and tight through the hole in the back…then ladder stitch the hole closed.
9. Add a button just like I did on the Sprocket Pillows (scroll to the bottom) and you’re done! Moosh it around good to get the stuffing around the edges and stick some pins in it.
Mein Laden
How cute is this???
I love it!!!
Miriam
Jamie Lee
Lovely! I've never made a pincushion before, but this is definitely on my list. You make it so easy! Thanks!
Laura @ Needles, Pins and Baking Tins
So so cute! Love it!
Quilter in the Gap
So cute...how big are your wedges?
Peggy
this is so lovely! I've been wanting to make a pin cushion or twenty and am collecting patterns! Thank you!!
Johanna
How cute! That is going on my to-do list!
PunkiePie (Jen)
So cute!! I made a sprocket pillow for my daughter's bed. Now I can have a little sprocket for my sewing room. Thank you!
Carol
That is really lovely.
Carol xx
Donna@My Sweet Things
I could use a few more pin cushions. I love this! Super cute and colorful! Thanks so much for sharing this lovely! Have a wonderful day!
Kim C
Too cute! What a quick gift idea too! Thank you!
2MuchFun
So cute and easy.
Jeni
Seriously cute! I can always use another pincushion! :)
randi
super cute! thanks for the how-to!
Patti
My sprocket pillow is an all time favourite....and now a pincushion!! I'm drooling!! Thanks!
Debbie
darling! What do you fill your pincushions with??
Jamie
I love that you post patterns and tutorials. Great job. More, More!!!
Rosemary
What a cute idea! Would love to make a few as little gifts for the holidays. Sewers and quilters will love this!
toots2u
Cutesy thing ever!! Your sprocket pillow is definitely one of my top 5 tutorials so I can not help but love this pincushion too! Thanks for the directions. Have a great day!!
Di~
Great cute pin cushion! I love that you used the term "ladder stitch". Years ago I made some items that required great amounts of the ladder stitch. I got good at it! and it's never left my brain!:) A good stitch. I use it a lot! Thanks.
Sallie
Cute! Thanks for sharing!
Michelle
So cute! And I NEED a new pincushion...great timing! :)
Claire Jain
Oh, come on. That is ridiculously cute! I might have to make this for my modern quilt guild gift exchange instead of the felt cupcake pincushion I was planning. Decisions! Decisions!
Kelsey
You are ruining my life, because I don't have time to make this, but now I have to. :)
patchworkdelights
Gorgeous pin cushion. I usually leave a gap on the side but prefer this option. Great tute. Thanks Fi
Glynis
Love all the little bits of fun fabrics you incorporated into this! Thanks for sharing the joy!
Habibti at Home
So cute! I am only bummed that none of my friends sew so they wouldn't be nearly as excited as I would receiving this. :) great tutorial for a quick last minute gift.
Vanesa
Love it! Thanks for sharing! I'm gonna try this.
Becky
Great stocking stuffer idea! Thanks! I need to add this to my long list of things to get done before Christmas--mine will be in aqua blue, red and white!
Janelle
What a great tutorial! I just made a pincushion and it was easy. Thanks for the great tutorial.
Jayme
OMGOSH ALLISON!!!! THAT'S THE CUTEST THING EVER!!!! I LOVE IT!!!!!
Dirt Road Quilter
Perfect! hank you so much for sharing your pattern. Your sprocket pillows were the first thing I added to my 2012 list. Can you believe I don't have a pincushion? Guess I've been waiting for the perfect one and here it is! May I ask what you used to stuff it?
idzncolumbine
Love this, especially the back opening for stuffing-had a big duh moment there. I am in the process of doing bird pincushions but these go on the list!
Miss Sews-it-all
Cute, cute, CUTE! Thanks for sharing - love this little pretty pincushion!
Cecilia
Very cute! I will be making some of these for gifts. Thanks for the pattern and tutorial.
**nicke...
excellent! so cute!
carol
it's so so cute!! thank very much!!!
Gayle
Beautiful, love it.
mujus
This is so cute! Thank you for the tutorial.
Sandy
So cute....I enjoyed making the sprocket pillow, now a mini version!
jmniffer
I've yet to make a pin cushion. You made this look easy and doable. On to my 'to-do soon' list. Thanks for sharing.
Crafty Cousins
Love it! Thanks for the tute!
fiberdoodles
Love it!
Sherri
Cute!
Drucilla's Stitches
Thank you for all your wonderful visual tutorials!! I ordered the pattern for the Christmas stocking last year and I'm just now getting time to make one. Without your instructions with pictures I was lost....thanks so much!!!
Merry Christmas!
b78ayers
Thank you SO much for sharing this wonderfully quick idea - took me about 10 mins. to make and it is adorable!
Tracy Johnson
Cute cushion! Am I the only one that forgets to leave open a hole to turn? I do it all the time.
DEBORAH
Perfect! I just made a pincushion like this that is less than perfect. It's on my blog.
And I think you're a genius for figuring out how to get the hole in the middle. So I put a link to your post on my blog.
DEBORAH
Oh yeah, the link: http://www.fourlittlemunchkins.blogspot.com
lindaroo
Brilliant to make an opening on the back, instead of along the curved seam. I plan to make one of these for myself, as soon as all the Christmas projects are taken care of...
Purple Quilter Queen
How cute! And what a clever idea for the little stuffing hole on the back! You are a genius! Good luck with the baby girl! When will she be making her debut? Jenn
Melissa Rush
I love all of your tutorials! Just finished the sprocket pillow, and really want the pin cushion to be my next project, but I can't seem to open the template on this one. Any suggestions? LOVE IT!
Kathy Davis
Cute pincushion. I have a thing for pin cushions. What did you fill it with and did you pull the button down someway so that it dips into he pincushion?
Thanks, Kathy
kdavis1@centurytel.net
dollardidit
Thank you so much!! I love this tutorial! Very easy with the pics and bullet point type of instructions. Also love the colors you use - bright and happy!!
Dawn
Love it and is very cute. I am going to make it as well. Did you fill it with fiberfill or a stainless steel pad. I have read the later sharpens pins.
Thank you for having the tutorial show up. I was just on another one and it gave me the run around and no directions.