
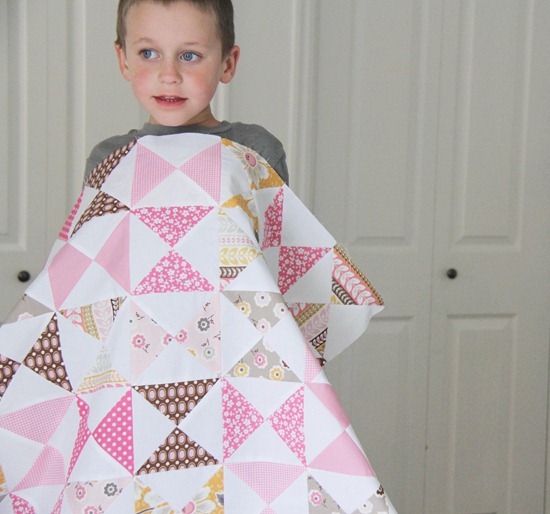
After staring at fabrics for too long trying to decide what pattern to make my baby a quilt with…I went with classic hourglass blocks. There are probably loads of good tutorials for these blocks already, but since these are one of my favorites I wrote one up for this quilt:
Baby Hourglass Quilt: Quilt size: 32" x 41" , Block size (unfinished): 5" x 5"
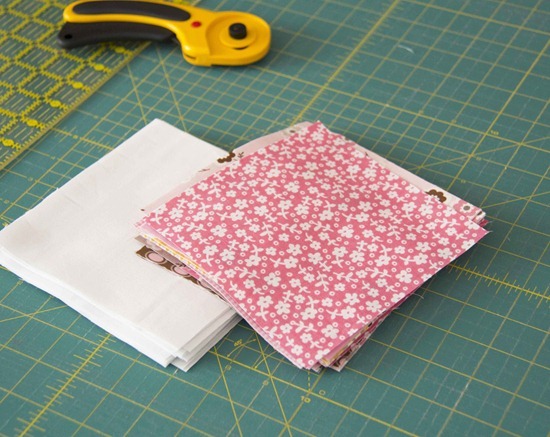
You’ll need:
32 print 6" x 6" squares, and 32 white 6" x 6" squares (approx. 1 yard cut into 5 strips 6" x the fabric width, then subcut 7 squares from each strip). For this particular quilt I used about 8 different print fabrics, and cut 4 squares from each fabric.
1. Draw a diagonal line in pencil from corner to corner on the wrong side of each white square. I know…I hate this part too….if it helps this is how I line up my squares then I draw lines on multiple squares at one time:

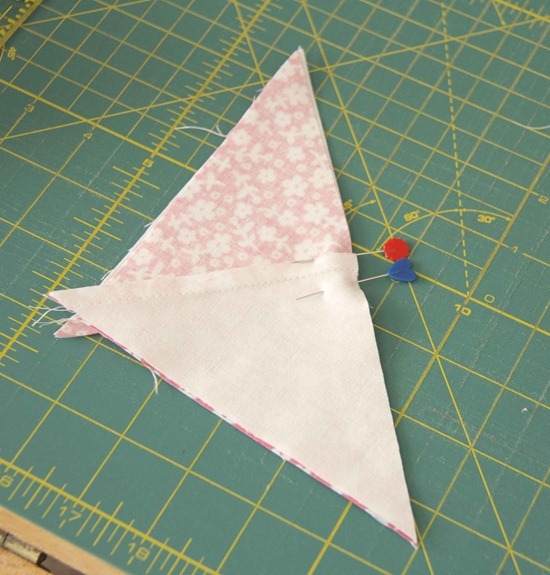
2. Pin a print square and a white square right sides together with the pencil line facing up. Sew ¼" from the line on each side ( I usually don’t pin these squares…but you should…I’m just lazy). Continue until all of the 32 print and white squares have been sewn together.
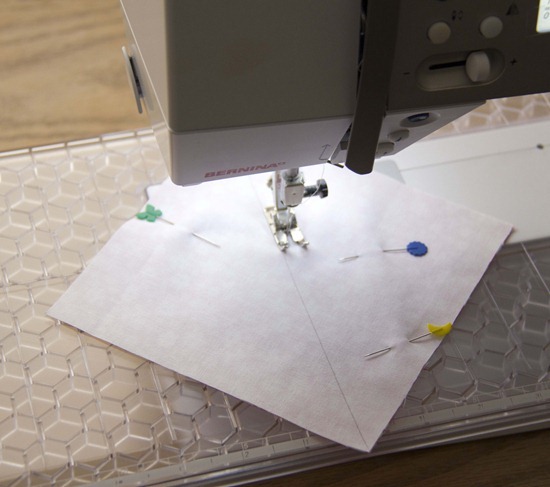
To make this process faster you can chain piece all of the squares. Sew on one side of the line on all of the squares, then without cutting the threads in between the blocks put them back through the machine and sew down the other side. Then when you’re all finished clip both threads in between each block.
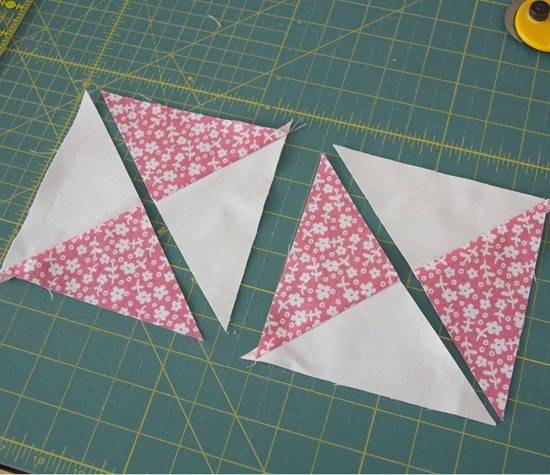
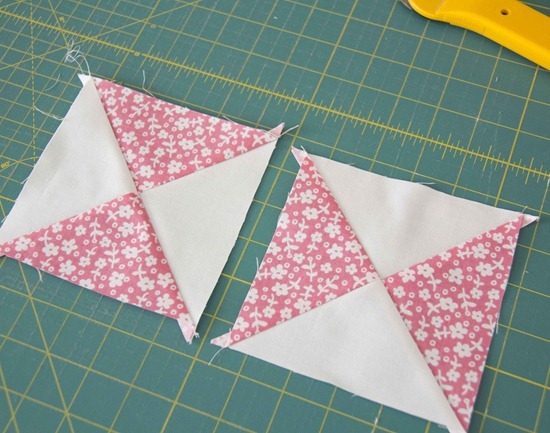
3. Place a square on the cutting mat, and cut down the pencil line from corner to corner. DO NOT MOVE THE PIECES YET! ( I pulled mine apart a little just so you can see the cut)

4. Cut another diagonal line from the other corner to corner on the same square.

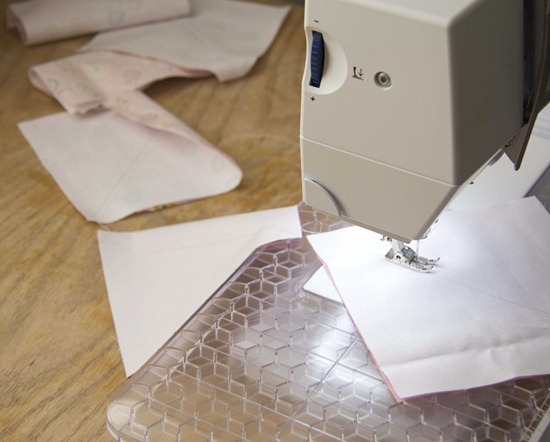
5. Press the triangles towards the print fabrics. You should be able to lay out 2 hourglass blocks from this one cut square:
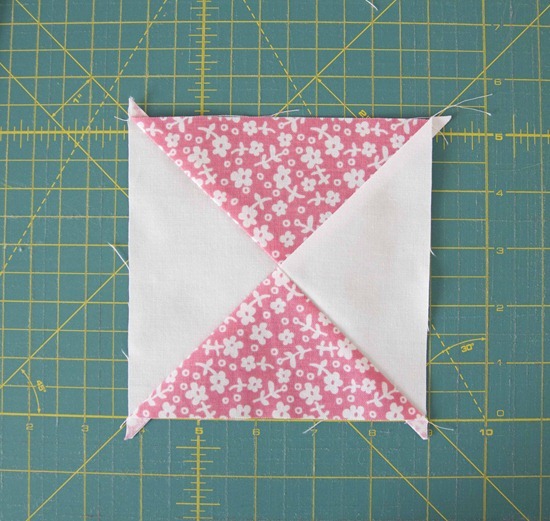
6. Match and pin the center seams, then sew the pieces together to make 2 hourglass blocks. Press seam to either side or open.
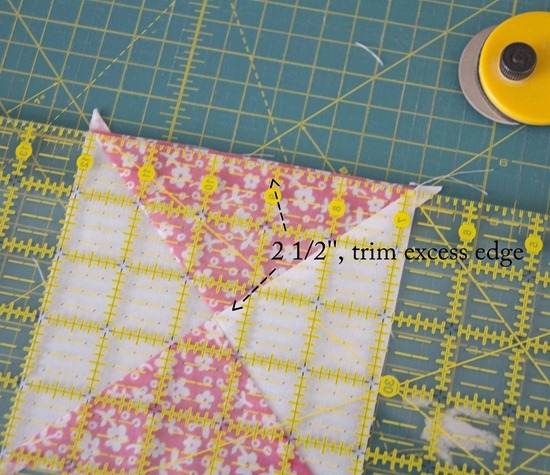
7. Now for the fun part (not really) squaring up the blocks to 5" x 5". Everyone has their own method of squaring…this is how I do mine:
Align the diagonal lines of my block with the diagonal lines on my cutting mat…
Measure from the center 2 ½" out on one side, and trim off the excess. Do the same on the top or bottom, then you can align the edges along the grid lines and trim the remaining edges to make a 5" block. If your mat doesn’t have these handy grid lines you’ll have to find another way, but simply measuring 2 ½" out from the center on each side should be fine. You can even cut more than one at a time if you’re not a perfectionist.

8. Lay the blocks out in 9 rows of 7 blocks each, rotating every other block. Sew the blocks into rows, and press the seams towards the print fabrics (that part is important so you’re seams will match up nice and tidy when sewing the rows together). Pin and sew the rows together to finish the quilt top.

Apparently it’s 5 year old boy torture to make him hold up a pink quilt…heaven forbid…you should have heard the grumbling.
*To make hourglass blocks in any size… cut your starting squares 1" larger than you’d like the (un) finished squares to be.
laxsupermom
Beautiful quilt! Love the fabrics you used! I am so in awe of accomplished quilters - getting all the corners to line up has always been a point of frustration with me. Great tutorial! Thanks for sharing.
Carolyn Forman
I LOVE YOUR CHOICES OF COLOR AND FABRICS. THIS IS SO DIFFICULT FOR ME TO TRY AND DO . BUT YOUR TUTORIAL WILL HELP ME TRY AND START OVER .....I PLAN TO MASTER THIS DARN BLOCK ASAP .....I WILL LEARN TO MASTER THIS )
Anne
It's lovely!
Lisa
Lovely quilt & thank you for the tutorial.
Lindsey
Thanks for the wonderful tutorial! I've been looking for a sweet quilt to make for my baby quilt, and I think I've found it!
randi--i have to say
oh so pretty! your quilt top is just perfect for your upcoming gal!
and your little boy...what a trooper! :)
~Niki~
a classic~lovely.
Lesley
This is such a beautiful quilt. Love the pinks!
eatmoresmores
Wow. We love it!
KaHolly
Very sweet little quilt and a perfect tutorial.
Amy
That is so pretty! I think it might be the simplicity that appeals to me.
Debbie
sooo sweet.
Kristen
beautiful
Johanna
So pretty! That is one of my favorite blocks too.
Lizzy
Completely adorable!!! Love all the pink!
Mary on Lake Pulaski
Beautiful - lucky little girl to be.
tracy_a
so lovely! great fabrics and pattern. thanks for the tutorial - not as hard as I thought it would be!
Jess
I never realized there was such a simple way to make that block! Thanks for the quick tute!
It looks lovely!
Ashley
Cute blanket! and thank you for the tutorial... it's fun to learn a new process!
Heleen Groot
LOVE the top. The colours are amazing! Thanks for the tutorial....maybe I'll just make one of these....
aksherry
That quilt is just too sweet!! I want one!!
Heather D.
Simple and classic, but no less lovely!
angela
Awesome tip on squaring. Thanks!
Marian
Beautiful! I love what you did and thanks for sharing your tips!
toots2u
So pretty!!
Rhona
Oh my goodness, each time you post another quilt I want to make one too!! They are all beautiful but this one is just perfect for your little girl (and I love DS's face ;o) ) Thanks for sharing and for the tutorial - which I'm now going to have to try! x
fiberdoodles
Beautiful & very sweet!!
Bruna
Thanks for sharing! This quilt is so pretty :)
Nice prints you chose!
marysza
ohhh.. this is so.. AMAZING!!!!
Ric Rac and Polka Dots
I think it is very sweet, good job. I did have to smile at the picture of your son. What a cutie pie. Poor thing, holding a pink quilt. He'll never live this down. He sure is cute though, in spite of his misery!
Julie
Anna
I love it! Classic and so very cute!
Betsy Lynn
Sweet...such a lovely quilt for a little girl!
Melanie@Crafty Cupboard
Pink Perfection! I'm still trying to master "squaring up," I made some Half Rectangles and I had to rest my brain for a day after. They still didn't turn out right!
When are you due, again? My sister had a baby yesterday- on Leap Day!
amandajean
it's really pretty, Al!
CitricSugar
Great tutorial - thanks.
That quilt top is lovely. Pretty but not too "precious". Love it.
Sallie
Very pretty! Thanks for sharing!
CJ
Sweet quilt and thanks for the tutorial!
Sylvia T. Zeringue
I think I will make one like this. So lovely.
diane
super cute
bethanndodd
You have one lucky baby...such a precious quilt. Thanks for the tutorial. Smiles~Beth
Dawn
It's truly lovely. Looks and sounds like it was made with love. :) There's just something great about "pink"!
Judy Blinkenberg
Please tell him thank you! It is a great quilt and I haven't made that pattern before. Thank you much and hope you are feeling ok these days.
quiltypleasuresonline.net
Allison I love this quilt - your little baby girl will love it too for sure!! Your tutorials are always amazing too, but I came across this one the other day which is super super speedy for HST and wondered if you'd seen it http://www.youtube.com/watch?v=ekYpJzHoW6E
It will change your life I promise!!
Best of luck with your impending arrival, Leigh
Oh Abigail
Thanks for the tutorial and a great finished result!
girlsfour
Very nice quilt - love the colors. Good thing pink has always been my fav color - we have four daughters!!! Love it!
Have a great weekend!
Meg
Lana
What a nice fresh looking quilt. This would be great to use some fabrics up from your stash.
Dana
So pretty and sweet! Love your fabric choices!
happydancequilting
That is just fresh and yummy in those fabrics!
happydancequilting
That is just fresh and yummy in those fabrics!
Donna~~
Pretty quilt! And thanks for making me smile--loved the 5 year old torture technique--you are so mean! ;)
Amy
This is a lovely quilt and a great tutorial! I'm not usually a pink person but these colours and patterns mix very nicely so I am now thinking of buying pink fabric!!! Amy from http://www.craftyshenanigans.blogspot.com
Melody Holz
I CANNOT WAIT to make a cute hourglass baby quilt...Thanks for the tutorial. VERY helpful!
Nancy
What an adorable helper you have, such bright blue eyes, love the quilt I'm starting one for a family member who has a little girl this will be perfect.
Jennifer J
Beautiful! Great tute! Definitely going on my list. Thank you!
quilt happy
this will be on my list to make
ultraorganized
This is such a cute quilt -- definitely will make this one -- thanks for the tutorial :) Terry
Jean
I love a classic block...perfect for the baby!
Dalya
It's gorgeous! I love classic blocks like these. I'm actually making an hourglass quilt, I started in the summer, eek! So it's good to see some beautiful inspiration.
:)
prsd4tim2
I really love classic blocks in modern fabrics, and who can resist such a fresh, girly baby quilt? It's so pretty. Congratulations on your new little one.
Cecelia
Adorable! Thank you for sharing!
Maria Filomena
Cara senhora,
Muito obrigada por compartilhar.....
abraços de MF
Claire Jain
So exciting! What a beautiful quilt :-)
Fort Worth Fabric Studio
ABSOLUTELY GORGEOUS!! love that, great job!
Truffle queen
Thanks for the tut! I'm passing it along to some quilting friends (snowbirds) in Florida. They will LOVE it! Beautiful quilt - handsome little boy!!
Rachel
Lovely! And I enjoy your awesome tutorials!
Mystica
Thank you for the tutorial. You make it sound so very easy.
Tsoniki
Beautiful! I wish we were having girls in our family - one of my cousin just had a boy and my brother and his wife are having another boy next month. I need more pink in my life! LOL
Stacy
would love to see how you ended up quilting this.
sandyb
This is so sweet!! Thank you for sharing!!
Live a Colorful Life
This quilt is so cute! I have looked at that fabric line. Now I'm going to see if I can get some...
Speaking of pink. My 5-year-old granddaughter and 4-year-old grandson are temporarily sharing a room until the new baby gets a bit bigger and then Levi will go back into his "boy" room. Charlotte's room is brown walls with white beadboard, but she has pink trim on the curtains, accessories, etc. It is driving my son NUTS. He says the room needs to be more "boy-ish." So my DIL is making some bunting out of little baseball pennants to hang on his side of the room. I guess that will "neutralize" the pink...
Valerie
Just math checking --- you started with a 6" square and ended with a 5" unfinished square, right? That yields a 4.5" finished square to my way of thinking when the seam allowance is taken into account. The end of the tutorial says to add 1" to your finished block size to determine the size of your starting square. I'm thinking it ought to be 1.5" to account for the seam allowances. Or would that just leave a larger margin for error when it comes to squaring things up?
Carol
Beautiful quilt and an excellent tutorial.
Carol xx
Jen Conlon
Great tutorial! You've been featured on the Quality Sewing Tutorials blog.
We hand select only the best free tutorials and patterns for the home sewist.
Grab a brag button!
Elisha
you make it look so easy. .thanx for the tutorial :)
coastal gray
Love to see the finished quilted project...
Bonnie
Gorgeous! I love the tutorial, and adore your little helper. I have two boys who are anti-pink as well. Too funny!
Conniecrafter
Gorgeous fabrics, so sweet!
Terri
Thanks for the inspiration, I love your pink and white hourglass quilt. I could hardly wait to start one and have dug into my scraps. So simple and pretty.
pippi
wow! i like colours & fabrics.
the photos are wonderful!
Adri
Thanks for posting these instructions! I used the same technique, but sewed the triangles together to make a chevron pattern. It turned out so cute! Thanks!
Nor
Me encanta tu quilt!!!!...es inspirador...
What a beautiful quilt !..
I wish you will visit my new blog and you could see the quilt I made thanks to your tutorial ....
http://mitallerdequilt.blogspot.mx/
hugs from Mexico!
Nor
Schulz Family
Your pink hourglass inspired me to do a boy's blue flannel one. Am thrilled. Karen. http://www.madewithmytwohands.blogspot.com
stitching under oaks
thanks so much for this tutorial...I loved it! I followed it strictly to make one for our family. I'm putting a post up today about it. I've linked to your blog...thanks again. I appreciate all the time and effort you put into this tutorial.
sue niven
A Great tutorial Thanks so much.
lucy's mom
started a square one got frustrated with that one so i started this one strying trying to finish the one i started before this one then i will fnish this one
DivaMomCarol
Have a bunch of 1930's kiddie novelty feedsack prints that would love this application. It will showcase their 'stories' and I can't wait to start.
Thank-you, Allison!
Donna Laster
I love the tutorial for the hourglass quilt. Your quilt is beautiful. I like the white mixed with the prints.
Donna from blackberrywintercrafts.blogspot.com
MamaDoc
If you want to avoid sewing triangles completely only make one diagonal cut. Then iron them open, mark your line on one of then again, put them RST with one square rotated 90 degrees and sew on both sides of the line, cut between and presto 2 hourglass blocks. I think jenny doan did it this way if I haven't explained it well. Thanks for your fabulous blog.
chrikina1234
So sweet...and what a wonderful tutorial - thank you Allison!
Ruth
I made this quilt this weekend and it took me 7 hours from start to finish-thank you for the great tutorial!
Brenda
I made this quilt for my future Great grand daughter due to arrive November 26, 2015
It was an easy quilt to make and it turned out beautiful just in time for the baby shower. Thank you !
Carolyn Phillips
I've just finished piecing all of the blocks in bright, primary colors, because it's a boy!!! My niece just adopted a tiny baby boy, and I can't wait to snuggle him in this beautiful quilt!!! Thank you for the great tutorial!
Cozy Birdhouse
Just finished mine! Thanks for the beautiful photos and helpful tutorial!
the cozy birdhouse | handmades for baby
Jeanette R Crawford
Just perfect.
Karla
Beautiful! Thank you for sharing your talents!
Sue
This is a charming quilt. Thank you for the tutorial. Had to comment re boys and the horror of them touching pink. I've never ever understood this one and mine are the same way. If women carried on about blue the way men and boys do about pink, WE would be labeled ridiculous, hysterical etc and they would not be wrong.
nanascout
Thank you, thank you, thank you! I used this to make my very first quilt top. After all that work, I didn't trust myself to quilt it, so I took it to a local quilt shop where they are doing the actual "quilting"...I pick it up tomorrow. I can. not. wait. to see how it turned out!
Allison
How exciting! I hope it turned out lovely!!!
nanascout
It did...I'd post a picture, but I don't know how! ;)
Shery Sullivan
I really can't wait to make this quilt for my new great granddaughter. I don't see a video. Or by tutorial do you mean the pictures? I'd love to see a video.
Allison
Yep I just mean pictures, sorry!
Robin (Bobbi)
What a cute idea! I'm in the process of making 170 Christmas pillowcases to donate to a senior facility and this would make a lovely quilt to use up the left overs.
Mary Lou
Beautiful baby Quilt. I'm in the process of making a Pinwheel Quilt. love the pink. I've noticed allot of Grey used in Baby Quilts which surprised me because I would never have thought to use Grey. But they also look beautiful. Great job and thanks for sharing.
Olivia meitzner
I'm having some trouble...I've cut the square twice diagonally ...but I don't know how to line them up to sew them all together so that they are one piece.
Barbara J
love the quilt pattern. making a 4 baby quilts. thanks for posting.
Judy Blinkenberg
I have loved this quilt since you made it. I will finally be making it for a special lady and her soon coming baby. I’m using Howdy in all the girl colors! I will share it when I get it done. Shimmer will be done when I have time!
Allison
How exciting Judy!
Judy
I am looking for !5" quilt blocks for beginners. It will be easier for me to learn
Debi
Hi! I realize you posted this tutorial awhile ago, but Im doing it now and just want to ask a question please! If I wanted to quilt this myself instead of sending it to the quilter, how should I do it? Im not very good at free motion quilting on my machine
Allison
Do you have a walking foot for your machine? Straight line quilting is also beautiful, and you can do a wavy stitch (see my last posts Layer Cake Bounce or type in wavy stitch into the search).
Meari
Adorable!
Tresha
Love your patterns but why do you not make them so they can be downloaded as a pdf?
Allison
The newer ones are available as PDF's, the older ones aren't I just haven't got around to it. At the time if I made them free printables...I'd find people selling my free patterns on etsy for money!
Susan
Thanks for sharing this. Love everything about your pink & brown quilt. I needed a boy quilt so I used blue, white & yellow. So, so fun. I’m hand quilting the top.
Kathleen Fleckenstein
You did not say how much material you need, also what about the backing?
Lesa
Lovely quilt and helpful tutorial. However I noticed you did not quilt the blanket nor tie it. Does it stay together for you alright ?
Sharon Bierd
I thought I would let you know I just made two of these quilts. I needed two for baby girls. It was my first attempt at making HST - that was a challenge and while I have put on bias tape binding before, it was a challenge this time. I do usually use a self binding method with pretty good results. As I'm not a quilter of traditional quilts, this was a real learning experience. I did find the tutorial useful but could have definitely used more information / structure of making HST. I would post a picture - just don't see anyway to do it.
SUSAN LOWE
Hi. I found this pattern only through a search on Pinterest and I'm really surprised it's not available as a pattern on the cluckclucksew website. Please, PLEASE alter that - this is a great pattern and a super tutorial - the instructions are SO clear. I would happily pay to own a copy of this pattern. I especially LOVE the tip about making different size hourglass blocks.
Susan
I just finished making the top of this quilt, my first quilt ever! Your instructions were excellent. This was a great learning experience for me. Some of my hour glasses did not line up perfectly but that's okay, I learned a lot through the process. Practice makes perfect, right?
Please tell me how did you bind the quilt? Did you use a contrasting print or a solid? I cannot tell from the photo. Any additional instruction would be greatly appreciated.
Allison
I think I used a matching solid, but it's been so long I can't remember! When there are a lot of prints in a quilt like this, I like using a solid that matches to tie everything together.
Stefanie
When sewing the triangles it shows you sewing the bases together in the first couple of pictures. The rest of your pictures you’re sewing the sides together. I’m new to this but should I sew both side and base of triangle? Or just sides? Or just base?
Patty Wilson
Love this quilt , the blocks are pretty easy, although mine don't all line up perfectly. I used neon colors with wild patterns and solid black to make a twin size for a teenager. It is very pretty & bold. Thanks for your great instructions.
Dani
Needing to make a baby girl quilt! I was going to go with chevron but THIS changed my mind! It’s beautiful! Thank you for sharing!